

The fastest way to a useful answer about your room is to send us the right information the first time. This guide shows how to measure your room for acoustic treatment: what to measure and photograph, and why each piece matters. Steps 1 to 6 take about fifteen minutes with a tape measure and a phone. The room measurement in step 7 is optional and takes longer.
1. Room Dimensions
Measure the length and width of the room at floor level, wall to wall. If the room isn't a simple rectangle, sketch the shape on paper and write each wall length on it. A photo of the sketch is fine.
Why It Matters: The dimensions set the room's low frequency behavior and how much surface there is to treat.
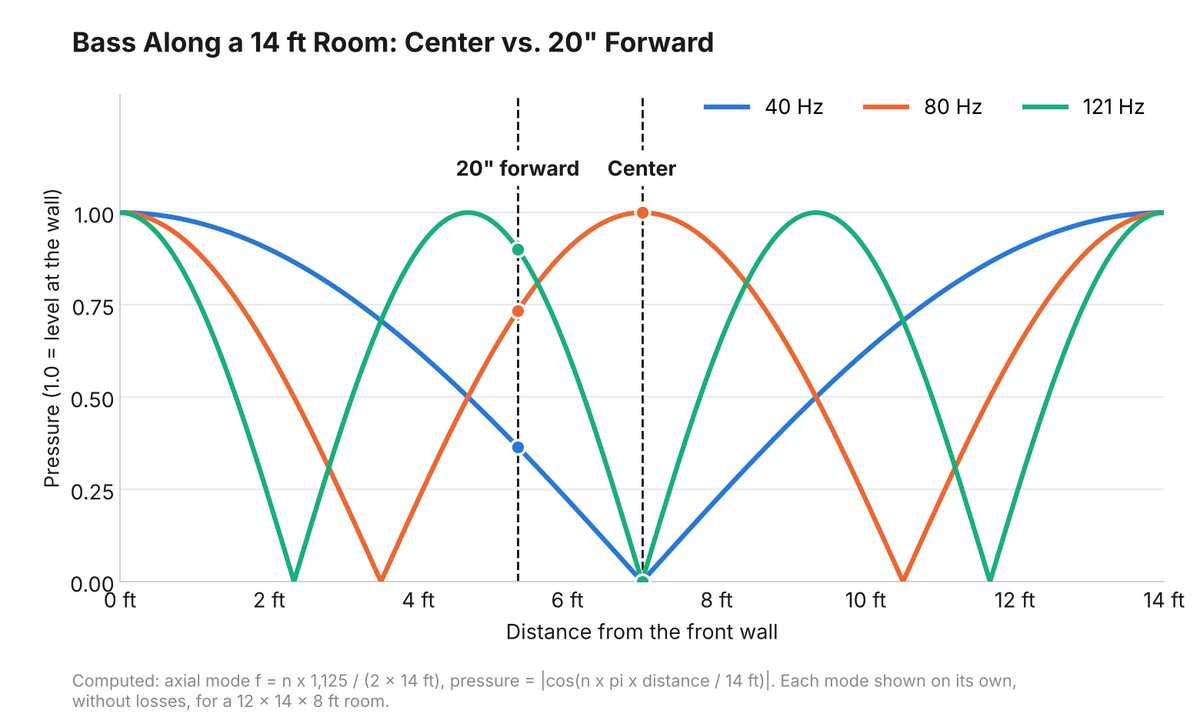
For example, in a 14 ft long room the first three length modes fall at 40, 80 and 121 Hz. Each one is loud in some spots and cancels in others along the room, as the chart shows.
2. Ceiling Height
Measure floor to ceiling. If the ceiling slopes, measure the lowest and highest points. Note any beams, soffits or skylights.
Why It Matters: Ceiling height decides whether clouds make sense and how far they can hang. It also decides how much height you can give up for isolation.
3. Photos of Every Wall
Stand in each corner and take a photo of the opposite wall, so every wall is in at least one shot. Add a photo of the ceiling and one of the floor. Landscape orientation, lights on.
Why It Matters: Photos show us windows, doors, outlets, vents and furniture: everything that decides where treatment can go.
4. Where You Sit and Where the Speakers Are
Mark the mix position or main seat on your sketch, and where the speakers are or will be. Write down:
- How far the front of each speaker is from the wall behind it and from the nearest side wall.
- How high the tweeters are off the floor.
- How far your head is from the front wall.
For a theater, mark the seating rows and the screen.
Why It Matters: First reflection points are measured from the listening position, and each speaker's distance to the walls sets where its bass dips land. Without those, panel placement is guesswork.
5. What the Room Is For and What's Bothering You
Tell us how you use the room: mixing, tracking, podcasts, movies, practice. Then tell us what's wrong in plain words. Boomy, harsh, too much reverb, the mixes don't translate, the neighbors complain. That last one is an isolation question, not a treatment one, and it changes the whole conversation. See soundproofing vs. acoustic treatment.
6. Wall and Ceiling Construction
Drywall over studs, plaster, concrete, brick? If you know, tell us. If you don't, a photo of an outlet with the cover off usually shows us.
Why It Matters: It decides how panels and clouds mount, and whether fabric track staples to the drywall or to framing.
7. How to Measure Room Acoustics (Optional)
A measurement shows which frequencies peak, which ones cancel and how long each one rings. Photos and dimensions can't show that. You need:
- An omnidirectional measurement mic (one that picks up sound equally from every direction) that comes with its own calibration file.
- An audio interface (or a mic with USB built in).
- A free room measurement program.
- The speakers you already use.
- Place the Mic: Put it on a stand at ear height, where your head is at the mix position. Point it the way its calibration file assumes. Most files come in two versions, one for the mic pointed at the speakers and one for the mic pointed straight up, so match the file to how you aim it. Stand back from the mic while it measures.
- Load the Calibration: Load the mic's calibration file in the program. If you use an interface, run the program's soundcard calibration, which usually means a cable from an output back to an input, so the interface's own response comes out of the result. If the program offers a loopback timing reference, use it so every measurement lines up in time.
- Quiet the Room: Turn off the air conditioning, fans and anything else that hums. Noise sets a floor under the measurement, and the end of the decay disappears into it.
- Set the Level: Play the test sweep at a moderately loud, comfortable level, well above the background noise and below the point where the speakers strain.
-
Run a Sweep: Use a logarithmic sine sweep covering the full range.
- A sweep separates most of the speaker's harmonic distortion, the extra tones a speaker adds at multiples of the test frequency, from the room's response.
- In one published comparison it gave about 15 dB more dynamic range than the older noise sequence method, which plays a repeating burst of pseudo-random noise.
- Longer sweeps put more energy into each frequency and lift the result further above the noise. One published research dataset used three 10 second sweeps per measurement.
- One Speaker at a Time: Measure the left speaker, then the right, then both together. Differences between left and right point to placement or a nearby reflecting surface on one side. If you use a subwoofer, leave it on and set the way you listen.
- Move the Mic a Few Inches: Bass peaks and dips change over short distances, so take a few more measurements a few inches to each side and front to back of the first one, then average them. Our post on why bass changes seat to seat shows how much.
- Read the Response: View the frequency response with 1/6 octave smoothing or finer. Heavy smoothing hides the narrow bass peaks and dips you are looking for.
- Read the Decay Time: The program reports decay time as T20 or T30 in each octave. Both estimate how long the room takes to fade by 60 dB, from the first 20 dB or 30 dB of the decay below a starting point 5 dB down.
For a decay time survey, the ISO 3382-2 standard calls for at least two microphone positions. Our post on how long a bare room rings gives the target for your room size.
What to Send: The measurement file exported from the program, plus screenshots of the frequency response and the decay time per octave. Note where the mic was for each one.
Optional, but Useful
- Budget Range: Even a rough number helps us suggest what to do first.
- Timeline: When you need the room working.
- Style: Photos of rooms you like, and whether you want the treatment to disappear or to be part of the look.
Sources
- P. Guidorzi, L. Barbaresi, D. D'Orazio, M. Garai, Impulse Responses Measured with MLS or Swept-Sine Signals Applied to Architectural Acoustics: An In-depth Analysis of the Two Methods and Some Case Studies of Measurements Inside Theaters, Energy Procedia, 2015.
- D. Di Carlo, P. Tandeitnik, C. Foy, A. Deleforge, N. Bertin, S. Gannot, dEchorate: a calibrated room impulse response dataset for echo-aware signal processing, EURASIP Journal on Audio, Speech, and Music Processing, 2021.
- ISO 3382-2:2008, Acoustics, Measurement of room acoustic parameters, Part 2: Reverberation time in ordinary rooms.
Send It Over
Everything above fits into our free room review form. Or email the photos and sketch to info@valleyacoustics.com. We'll come back with a treatment plan and a price. Reach out to us for design assistance.